Well here we go! My insane micro scale terrain project is developing legs fast. I've set up a file sharing account on box.com where I will post my paper terrain as I finish it. As of now I just posted my first building and a foundation file and it can be found here: http://www.box.com/s/lqcylf4l6xk5x31tk9o8 My priority is to get a bunch of simpler and easier stuff up and running first and then move on to the trickier stuff.
I am still in a learning curve on the creation end of this project, so the terrain will improve a lot as we go along. For now this is simple and easy to build.
While I am new to creating this stuff from the ground up, I am not new to paper terrain. I've built a ton of this stuff, with fair success and have had quite a few people ask me how the hell I can build so much stuff so fast. I thought this might be a good time to post a tutorial for anyone interested. Now, that being said, if you want to see the RIGHT way to build this stuff in all its glory, you should go to Vampifans blog! But if you are like me, more of a dark side of the force type, (faster, easier) than this is the way to approach it! With me, it is always about mass effect. Anyway, here's the scoop!
Oh, and VERY IMPORTANT! Please read the first step about printing very carefully. And pay attention to the glue in step 3.
 |
| First off, with any of the files you get from myself, and most other sources as well, it is very important to print with these settings from the PDF file. If page scaling is turned on then the printed dimensions won't jive. This is really a problem if doing an urban setting with city block style streets. For stand alone structures it is not so important. I recommend measuring the printed pieces the first time around to verify that all is well. You don't want to build a ton of stuff and find out it doesn't work together. I am building all these with a standard foot print increment of 2"x2" for buildings, and 3"x3" for foundations. When I start posting larger structures, they will all increase by these increments so it is easy to make city layouts that fit together well. |
 |
| This is pretty much what all you will need. Cardstock paper (the heaviest you can feed through your printer), ruler, cutter, markers, and glue. The glue is crucial, see next step. |
 |
| Here is my glue of choice. I have tried everything ever made, and this is hands down the best stuff ever. Glue sticks suck, and most white glues have too much moisture. Spray adhesives are great for large tiles but cannot be used for delicate work. Aleen's makes all sorts of glues, and while many of them will work, this is the bomb. It will grab and hold itself in place within a few seconds, and be ready to handle quite roughly within minutes. It is transparent for areas you don't clean up as well. I generally apply a little bead as you will see later, and then smooth the excess with my finger. |
 |
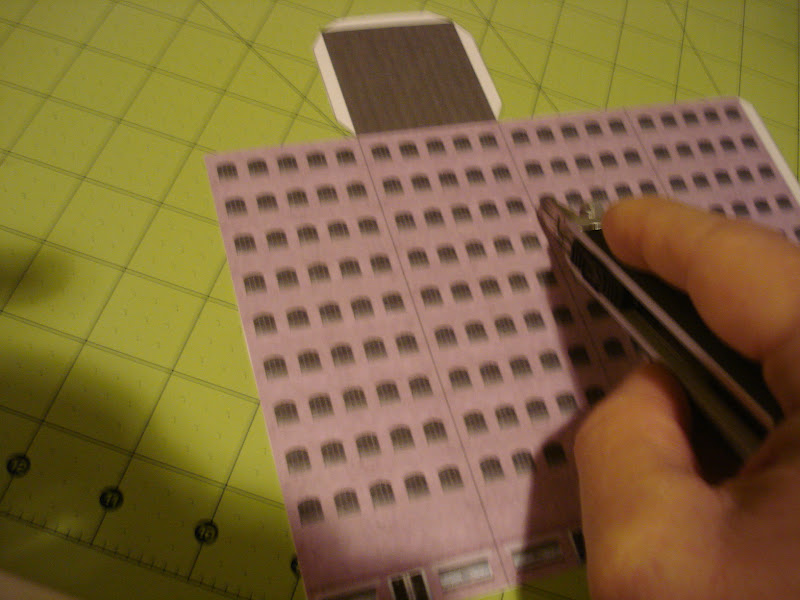
| I suppose you are supposed to use a ruler for cutting along the lines. In practice however, I generally do not use one except for certain crucial cuts. I have found with a little practice I can free hand cut very accurately, and in only a fraction of the time it takes to line up the bloody ruler. This is the single biggest time saver for dark side paper model building! It is huge. I will use a ruler on the bottom edge of larger structures sometimes where it sits on the ground to make sure it is very even, but usually I still don't. I'm stubborn that way. |
 |
| Here I am breaking the rules with a free hand cut. Normally my other hand would be close by to steady the paper but I had to hold the camera. |
 |
| Cut out the outline of the entire building, including the fold over tabs. Learn how much pressure is required to cut all the way through the first time around and try to do so. Coming back and re-cutting is usually harder to do, and wastes time. |
 |
| The next step is to lightly score the interior fold lines. With a little practice you will learn how hard to score the paper. If you push down too hard you will have very wide fold lines, or even cut through. This is just practice. It is best to press too lightly as even a very light score will usually allow a good fold. B sure to score the lines between the white fold over tabs and the building as well. |
 |
| Now it is time to pre-fold all the sections. Folding large sections is easy, and it is a bit trickier when you ave very small tabs like shown. Fold them all the way over (overbend) and then let them come back a little. |
 |
| Here is my building cut out, and pre-folded. |
 |
| Here comes a super important step for making good looking buildings. Take the extra 10 seconds to black line all the visible edges of your model, it is well worth it. Once it is all folded and glued, there are always some white lines that manage to peak out, and this will keep it to a minimum. While I don't go nuts with this and go back to line every little crevice, I have found that with the basic edging it produces good results quickly. |
 |
| Be sure to black line the folded edges like I am doing here as well. These joints are some of the worst about showing white after it is folded. You can use other color pens for different building colors as well, but black is a good standard that works with most anything. |
 |
| We are ready to glue. I just apply a sporadic bead like this. I generally choose the longest structural glue point for the first glue step and let that set up before going back to glue everything else. It is usually too hard to glue it all up at once, and this glue grabs fast so you can get in trouble if you get greedy. |
 |
| After applying the glue, I smooth it out with my finger. Keep a rag or paper towel handle to wipe your finger before handling the model afterwards. I like to make sure that I smooth the glue all the way to the edge that will mate with the other piece of paper. |
 |
| With buildings of this small size, I have found that it is easiest to accordion the building flat on the table and firmly press it down along the seam several times. This makes it easy to line up and allows you to apply a lot of pressure. However, do NOT leave it in this position too long or some glue that seeps into the building could take hold and glue the inside! |
 |
| As soon as the glue grabs and is holding well (with this glue it is just a few seconds) slightly pop it apart as shown and let it sit for a few minutes while you work on something else. You do not want to open it up all the way yet because that will put stress on the freshly glued seam. I like to build several things at once so I can set stuff aside for a couple of minutes and stay busy. |
 |
| So while we wait for that seam to really get some strength, I will get the foundation ready. First I cut out the outside and inside squares. |
 |
| Then I cut through the corner tab joints. Cut these through so they can fold up. |
 |
| Before folding, you should score between the tabs and the graphic. Now strictly speaking, what I am showing here is wrong. In order to bend these tabs upwards, the correct score would be on the bottom of the piece. In order to do that I have found it is easiest to punch a couple of slits from the top side and then use those as a guide to make your scores from the back side. However, since we are using the dark side of the force here, I am simply scoring them from the top. While this is not optimum, in this particular situation it gives enough relief for a decent bend, and this location is not critical because it will all be inside the building. All the score is doing is guiding your bend. Doing this my way saves a bunch of time. |
 |
| Here is the cut and folded foundation piece. |
 |
| But we still need to black line! On these, you just need to do the outer edge. All the tabs will be hidden inside the building. |
 |
| Sorry for the horrible photo. Now we grab our building and apply a bead of glue to the three roof tabs. |
 |
| Then smooth out the glue. |
 |
| Then carefully shove it in place. The thing to watch here is that you do not push the roof too far inside the building. If you do (and you will), just grab your cutter blade and quickly pop it back up and align it again. A little practice will make this easy. When the roof is in place, gently press the wall and roof edges together from all four sides for a few seconds until it grabs. |
 |
| The one occasional use I do have for the ruler is to reach down inside deep structures to push a fold tab against a wall. Once again, be gentle here. |
 |
| Here is one of those darned white lines that shows up against a dark background after making a fold. If they are bad enough I get out a smaller tipped marker and give it a swipe. |
 |
| While not perfect, it does look a lot better. |
 |
| Now all you have to do is put a bead of glue around the fold tabs on the foundation ad pop your building on it. You can reach in and carefully press them together, but often I don't even bother. Do pay attention that the building foot print is sitting square with the foundation. |
 |
| And there you go, a brand new building for your table! Rinse and repeat. My total hands on time putting this building together was around 5 minutes. When you first start out, it will probably take you closer to 20, but with a little practice these things can go together really fast if you follow the ways of the dark side. |